Updated: May 24, 2026 | By Dan Milburn
When your Clipper jet lighter suddenly stops working, it is an instant buzzkill. Clipper torches are legendary for their affordability, refillable tanks, and eco-friendly designs, but just like premium lighters, their microscopic jets are prone to unexpected failure.
If your windproof flame won’t strike, it’s easy to assume you bought a lemon. But after dismantling thousands of pocket torches on my workbench, I can tell you that most Clipper jet issues come down to minor, everyday hiccups: an air-locked fuel line, a tiny piece of pocket lint, or an unadjusted flame wheel.
In this updated 2026 troubleshooting guide, we are going to walk through the exact steps to revive your dead Clipper jet lighter fast. Whether your flame cut out right after a fresh refill or your igniter is clicking without a spark, let’s get your torch back to firing flawlessly.
The TLDR 30-Second Summary
Quick Clean: A single spec of dirt can block a jet nozzle. A quick 3-second blast of compressed air down the burner usually solves a weak or sputtering flame.
The No-Fuel Blind Spot: Clippers don’t have a fuel window. If your lighter clicks but doesn’t hiss, it is likely completely empty.
Post-Refill Sputter: If your Clipper failed right after refilling, you trapped air in the line. You must bleed (purge) the tank entirely before injecting fresh butane.
Flame Adjustment: The adjustment wheel on a Clipper jet can be highly sensitive. If it’s turned too low, the lighter won’t hiss; if too high, the pressure blows out its own spark.
For a more in-depth guide for troubleshooting for all torch and jet flame lighters, see my Torch Lighter Not Working post.
Disclosure: LighterPoint.com is a participant in the Amazon Services LLC Associates Program, as well as other affiliate programs, designed to provide a means for us to earn fees by linking to Amazon.com and affiliated sites at no extra cost to you. Please see the Affiliate Disclosure for more details.
The Clipper Jet Lighter Quick-Check Table
| If your Clipper jet… | The likely problem is… | Immediate Action Step |
| Clicks but makes no hissing sound | Tank is empty or flame dial is too low | Check fuel level / Turn up flame dial |
| Sputters / won’t light after a refill | Trapped air pocket (Vapor lock) | Jump to Step 1: The Purge |
| Hisses loudly but won’t ignite | Flame dial too high or wire misaligned | Turn down flame adjustment / Nudge wire |
| Clicks but shows a weak/small spark | Dirty or soot-covered igniter tip | Jump to Step 3: Igniter Clean |
| Flashes quickly then instantly dies | Clogged burner jet or cheap butane | Jump to Step 4: Jet Blast |
| Hisses from the bottom valve | Blown internal seal | The lighter is dead; time to replace |
Step 1: The Blind Fuel Tank & The Deep System Purge
One of the biggest design issues with Clipper jet lighters is that they do not feature a fuel level window. Unlike other premium torches, you cannot simply look at the side of the casing to check your butane levels. If your lighter clicks but you don’t hear a faint hissing sound, it is highly likely you are simply dealing with a completely empty tank.
However, if your Clipper jet lighter stopped working immediately after a fresh refill, you’ve almost certainly got a trapped air pocket (vapor lock). Every time you fill your torch with butane, a small amount of ambient room air gets forced into the chamber. Over multiple refills, this air creates a pocket of intense pressure that blocks the liquid fuel from feeding into the ignition lines.
Here is how to empty the air and fill your Clipper properly:
- Clear the Lines: Turn the flame adjustment wheel at the bottom of the Clipper all the way down to the lowest setting (-).
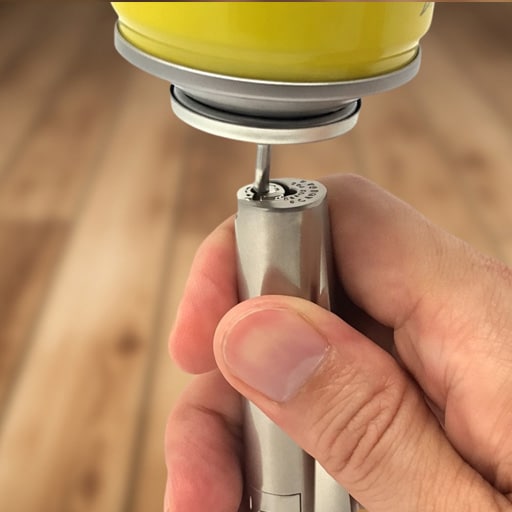
- Bleed the Valve: Hold the lighter completely upside down. Use a small precision screwdriver, a brass bleeding tool, or the tip of a pen to press straight down on the center pin of the refill valve.
- Vent Completely: Hold the pin down for 3 to 5 seconds. A rush of trapped air and cold propellant will escape loudly. Repeat this process 2 or 3 times until the valve is completely silent.
- Inject Fresh Fuel: Keep the lighter upside down, shake your high-quality butane can, and press the fuel stem firmly into the valve for about 5 seconds.
- The Cold Trap Rule: After refilling, the lighter will feel freezing cold to the touch. Let it sit untouched on a room-temperature counter for 3 to 5 minutes so the fuel can warm up and vaporize properly before you try to strike it.

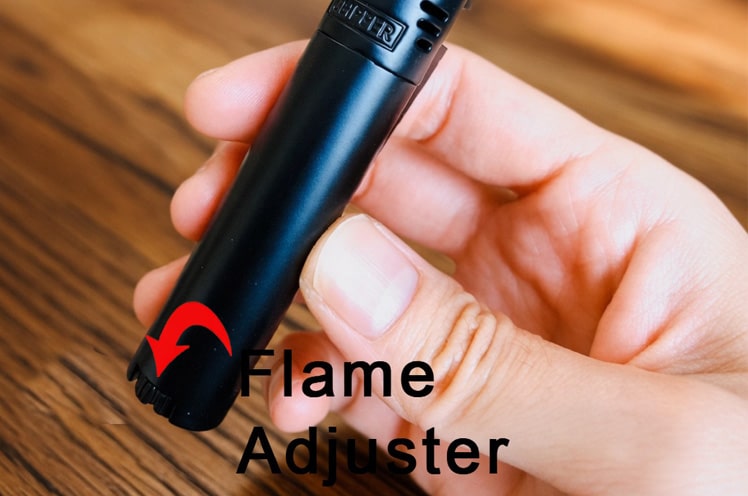
Step 2: Finding the Flame Adjustment “Sweet Spot”
If you know your Clipper has plenty of fuel, and you can hear a distinct hiss when you push the trigger, but it still won’t ignite, your flame adjustment is likely out of sync.
Clipper torch valves can be incredibly sensitive to minor adjustments.
The Fix: Look at the bottom of your Clipper jet. Depending on your specific model, you will either see a small plastic wheel or a recessed brass screw marked with (+) and (-). Turn the adjuster all the way down to the minimum setting, then rotate it slowly toward the plus side in small increments. Test-strike the lighter at the 50% mark and adjust up or down from there until the jet catches consistently.
The “Blow-Out” Issue: If your flame wheel is cranked up to the absolute maximum setting (+), the gas pressure rushing out of the micro-jet nozzle is too violent. The force of the gas will literally blow out the electric spark before it has a chance to light the butane. It’s the equivalent of trying to light a match in front of a high-powered fan.
The “Suffocation” Issue: On the other hand, if the wheel is turned too close to the minimum setting (-), there isn’t enough gas density rising out of the burner cup to catch the spark.
Step 3: Checking and Cleaning the Igniter Spark
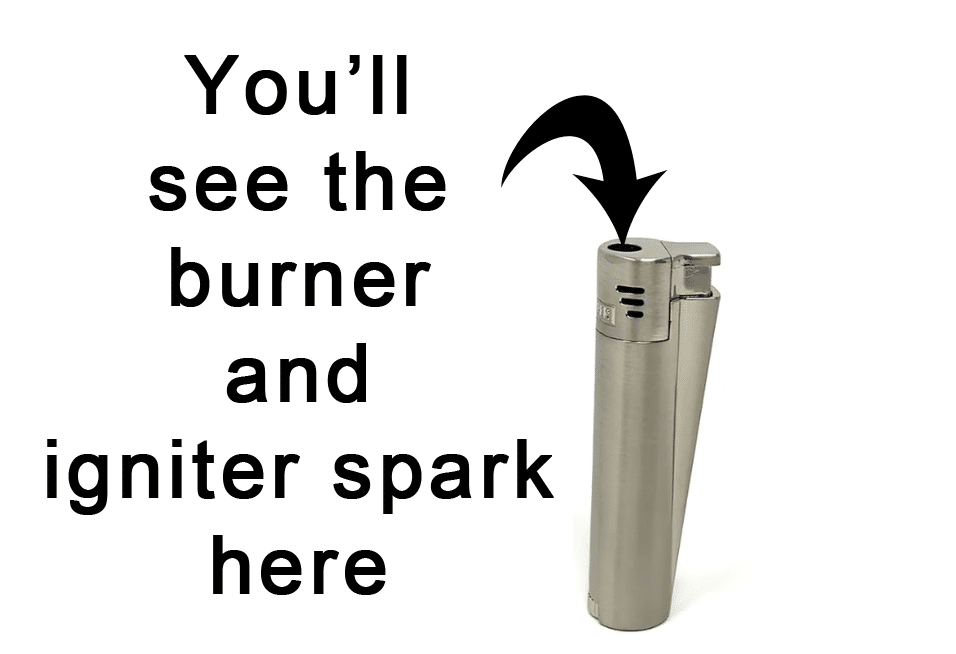
If you press down on your Clipper’s trigger and you can hear the gas hissing, but the lighter refuses to catch fire, you need to look closely at the ignition point. At the end of the small internal wire inside the burner head, you should see a bright, crisp blue spark jump every time you pull the trigger.
- The Weak Spark Problem: Over time, a thin layer of carbon soot or dirt can coat the tip of that tiny metal electrode wire. This carbon acts as an insulator, making the spark incredibly weak, small, or non-existent.
- The Misaligned Wire: Because Clippers are tossed into pockets, backpacks, or drawers, that tiny ignition wire can easily get bumped out of alignment by just a millimeter. If the spark jumps to the side of the metal housing instead of directly over the gas jet stream, the butane will never ignite.
- The Fix: Grab a cotton swab dipped in a tiny drop of 90% Isopropyl Alcohol and gently clean the tip of the electrode wire to strip away any black carbon buildup. If the wire is bent out of place, use a wooden toothpick to gently nudge the tip back toward the center of the jet nozzle.
- Important Warning: If you clean the tip and ensure it’s aligned, but clicking the trigger produces absolutely no spark and a soft, mushy click, the internal mechanical piezo crystal element has failed. Because Clipper jets are budget-friendly lighters, a failed piezo means the lighter has reached the end of its lifespan, and it’s time to replace it.
Step 4: Debris Extraction (The Burner Jet Blast)
Clipper jet lighters are incredibly popular daily carry tools, which means they spend a ton of time living inside deep pockets, cup holders, and bags. This constant exposure makes them a magnet for pocket lint, dust, tobacco flakes, and small bits of grit.
Unlike a soft-flame Clipper, where a bit of dirt won’t stop the flint wheel from working, a jet torch relies on a precise “Venturi effect” to mix pressurized butane with oxygen. If even a single speck of pocket lint falls down into that tiny brass jet nozzle, it will completely block or distort the gas stream, causing the flame to sputter, pop, or instantly extinguish itself.
- The Absolute Golden Rule: Never try to clear a clogged jet nozzle by blowing into it with your mouth. The heavy moisture in your breath will instantly corrode the internal metals or clump the loose pocket dust into a hard, cement-like clog that permanently ruins the torch.
- The Fix: Grab a can of compressed air. Hold the straw attachment roughly one inch away from the top of the burner head and blast it with three short, sharp bursts of air. This safely dislodges loose dust and lint out of the nozzle without introducing harmful moisture.
- The Needle Warning: Never shove metal sewing needles, safety pins, or paperclips down into the burner holes. These micro-nozzles are engineered to microscopic tolerances. Forcing a hard metal needle inside will scratch or warp the opening, permanently ruining the jet velocity and turning your windproof torch into a weak, yellow candle flame.
Regular Maintenance for a Long-Lasting Clipper Jet
Unlike standard soft-flame Clipper lighters that run reliably for years with almost zero upkeep, jet torch lighters require regular, proactive maintenance. The mechanical tolerances required to create a windproof blue flame are tiny, meaning minor daily issues quickly snowball into total ignition failure.
To keep your Clipper jet firing strongly for every single smoke, add these three quick habits to your routine:
- Purge Before Every Refill: Never skip this step. Trapped air is the number one reason Clipper jets sputter or stop working entirely after being topped off.
- Keep the Burner Covered: If you carry your Clipper jet in a pocket or backpack, consider keeping it in a small pouch or ensuring it isn’t buried loose beneath lint-heavy clothing.
- Adjust the Flame as Fuel Drops: As the internal butane volume decreases over a couple of weeks, the internal tank pressure drops naturally. If your flame starts getting weak, give the bottom adjustment dial a slight turn toward the plus (+) side to compensate.
- Use High-Quality Butane: Using low quality unfilterd butane will clog up your Clipper jet so fast it will make your head spin. If you are unsure of what the quality brands are see our guide on the best butane for torches and our post on why butane quality matters for lighters.
If your clipper is beyond repair and are now in the market for a new lighter, we put together a post that covers the best torch lighter brands, where you can compare the top torches on the market.
Also, I should mention that before you toss that broken clipper lighter, check out our short guide on how to safely get rid of torches.
Clipper Jet Troubleshooting FAQs
Why is my Clipper jet lighter not working after a fresh refill?
If your Clipper worked great before you filled it but fails now, you are dealing with trapped air pressure (vapor lock) or cold fuel temperatures. When cold liquid butane enters the tank, it shrinks the internal seals and refuses to vaporize properly. Bleed all the air out of the bottom valve using a small screwdriver, refill it upside down, and let it sit on a room-temperature counter for 5 to 10 minutes before striking it.
Why do Clipper lighters stop working completely over time?
Over time, the two most common causes of permanent Clipper failure are piezo crystal wear and internal O-ring dry-rot. The internal piezo element creates the electrical spark; after thousands of clicks, that crystal naturally cracks or wears out. Additionally, using low-quality, unrefined gas station butane leaves heavy end oils behind that bake onto the micro-jets, permanently clogging the internal fuel lines.
How do you adjust a Clipper jet lighter’s flame height?
Flip the lighter upside down and look at the base. Depending on your specific Clipper model, you will see a small plastic wheel wrap or a recessed brass screw marked with a plus (+) and minus (-). Turn the dial slowly toward the (+) to increase gas flow for high-altitude smoking or low-fuel situations, or dial it toward the (-) if high pressure is blowing out your ignition spark.
Is a Clipper jet torch lighter good for lighting cigars?
Yes, they are an excellent, budget-friendly option for daily cigar smokers. The focused, windproof jet flame is ideal for cleanly toasting and lighting 42 to 60 ring gauge cigars, especially when smoking outdoors or on a golf course where wind easily ruins a soft flame lighter.
Should I replace my Clipper jet lighter if it keeps failing?
If you’re having a constant fight to fire up your Clipper Jet or internal parts are failing, I’d consider getting a new one.
A Final Word On Clipper Jet Troubleshooting
At the end of the day, a pocket torch is only as reliable as the fuel you feed it. Running cheap, generic, unrefined butane through a precision jet lighter is the absolute fastest way to clog the valves and turn a great tool into trash.
If you want your Clipper to strike on the very first click, skip the bargain-bin canisters and invest in a high-quality, multi-refined fuel brand. Taking just five extra minutes to properly purge the air, clean the burner with a blast of compressed air, and let the tank warm up after a fill will keep your Clipper jet firing perfectly for a long time to come.
Is your Clipper jet still giving you a hard time on your workbench? Drop a comment below describing exactly what happens when you pull the trigger (Is it hissing? Is it sparking? Did you just refill it?). I check the comment sections regularly and am happy to help you troubleshoot your setup!

- Best Torch Lighter Brands In 2026 - July 3, 2025
- Best Pocket Torch Lighters In 2025 - June 30, 2025
- How Does a Torch Lighter Work? - June 29, 2025